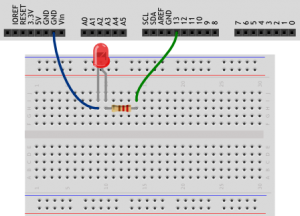
In this tutorial we are going to create our first arduino project. It will be a simple blinking light-emitting diode.
To install Arduino IDE on your Linux Mint system you should:
1. In the terminal type and install Arduino IDE
|
1 |
sudo apt-get install arduino |
2. Add your user to the dialout group
|
1 |
sudo usermod -aG dialout %username% |
where %username% is your username
3. Reboot your computer
4. Plug in your Arduino board. Open Arduino IDE and click Tools -> Serial Ports -> /dev/ttyACMx. There you should see the port number your Arduino board connencted.
5. Go to File -> Examples -> 01.Basics -> AnalogReadSerial and try to upload a project to your board. Everything should be ok.
For our project we need:
1x Arduino Uno
1x Breadboard
1x LED 5mm
1x 220 Ohm resistor
2x wires
Sketch:
|
1 2 3 4 5 6 7 8 9 10 11 12 13 14 15 16 17 18 19 20 21 22 23 24 25 26 27 |
//this function executes only 1 time when you initialize a program void setup() { //setup pin №13 in the output mode(voltage source) pinMode(13, OUTPUT); } void loop() { //apply high signal on the pin №13(5V) //current will run through the LED and it will start to shine digitalWrite(13, HIGH); //delay microcontroller in this state for 100ms delay(100); //apply low signal on the pin №13(0V) //light will go out digitalWrite(13, LOW); //delay microcontroller in this state for 900ms delay(900); //once you upload a sketch function loop starts working repeatedly //LED starts blinking one time per second } |
Result:

